Fivetran, Data Lineage, and you.

 Introduction
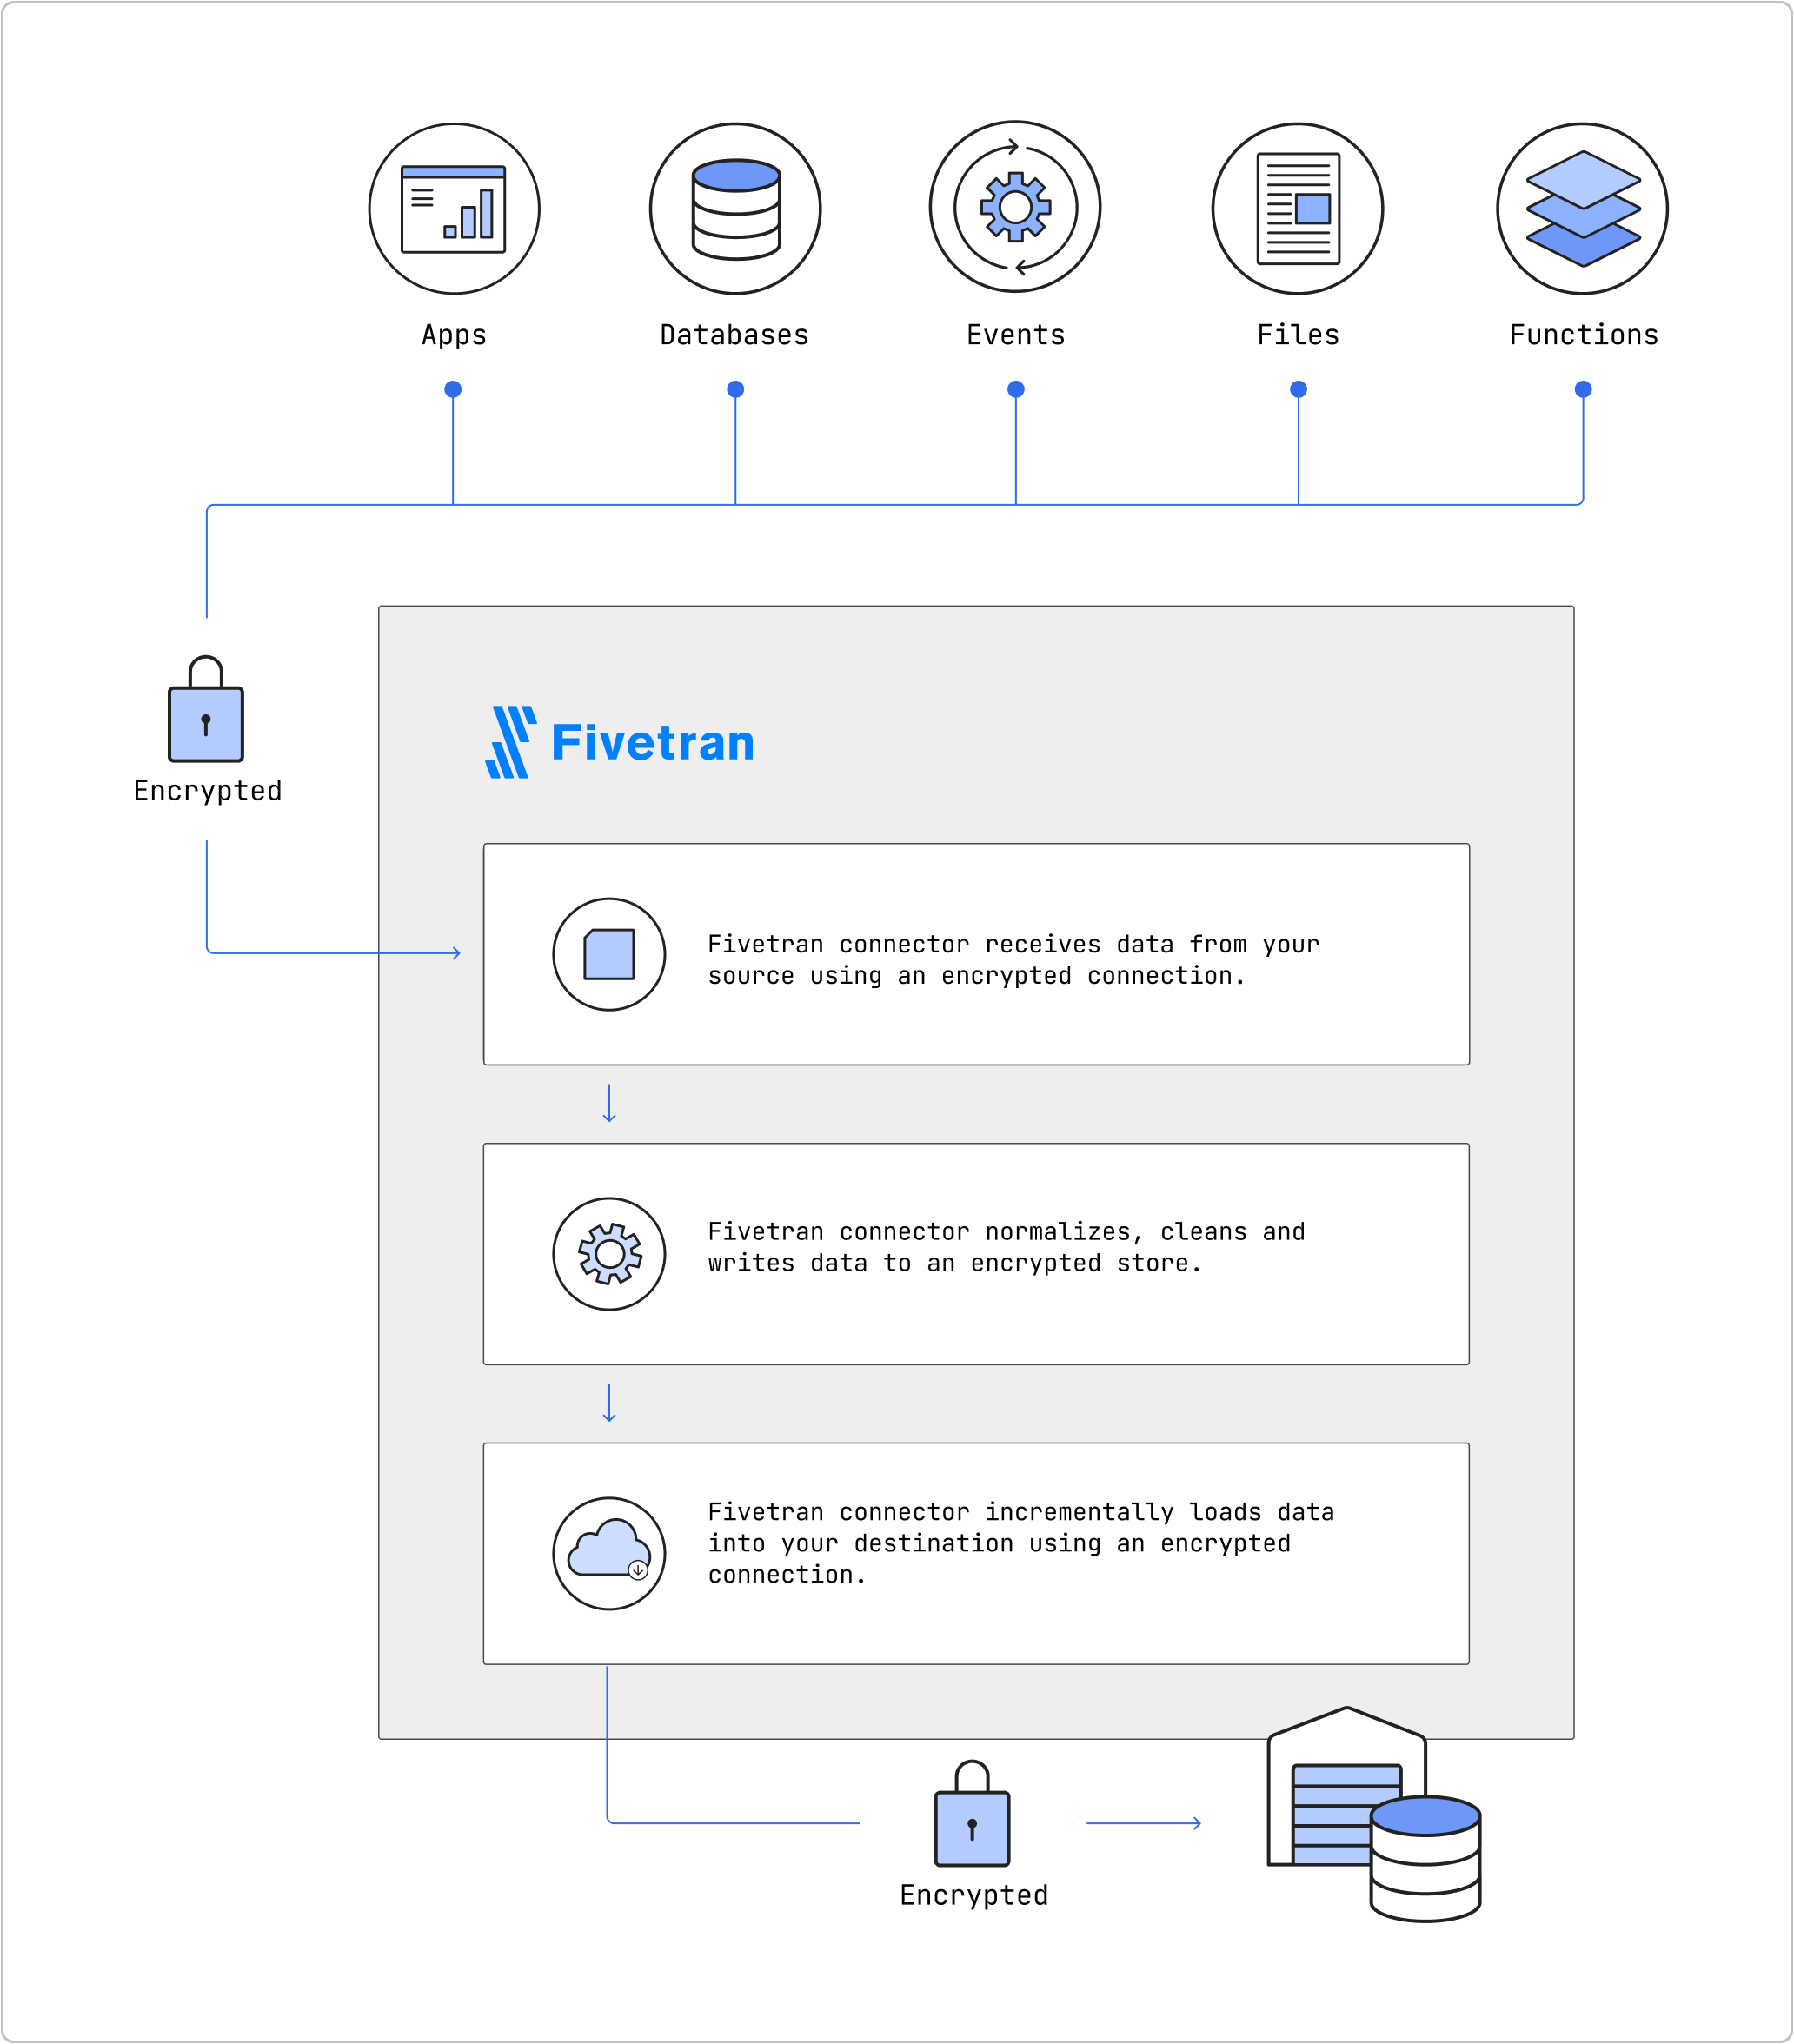
Since its founding in 2012, Fivetran has formed a core component of the data stack for many organizations. This is especially true for data teams who have adopted ELT architectures in which source data is copied directly into a warehouse before performing transformations.
In addition to its great connectors, Fivetran exposes a fantastic API that allows users to programmatically control much of their infrastructure. Today we are going to walk through everything you need to extract data lineage from Fivetran.
Background
There are a few Fivetran concepts we need to be familiar with before proceeding.
Sources & Destinations
Source are the places we intend to copy data from, such as Postgres, Airtable, and SalesForce, while destinations are the places where we are going to copy data into, like Snowflake, BigQuery, and Redshift.

Connectors
Connectors are responsible for actually synchronizing data from a source to a destination. How it accomplishes that goal doesn't matter, all we need to know is that they copy data from Source -> Destination.

You can also collect sets of related connectors together into something called a Group. One common strategy is to create one group of connectors for production, and another for staging or development.
The Game Plan
Our goal is to extract data lineage from the Fivetran API for each connector.
Conceptually the Connector ought to tell us which Tables and Columns are related to each other between different sources and destinations. So if we can find all of our connectors, we can find the source & destination for each connector, then determine which tables and columns in each destination correspond to which counterpart in the connector source.
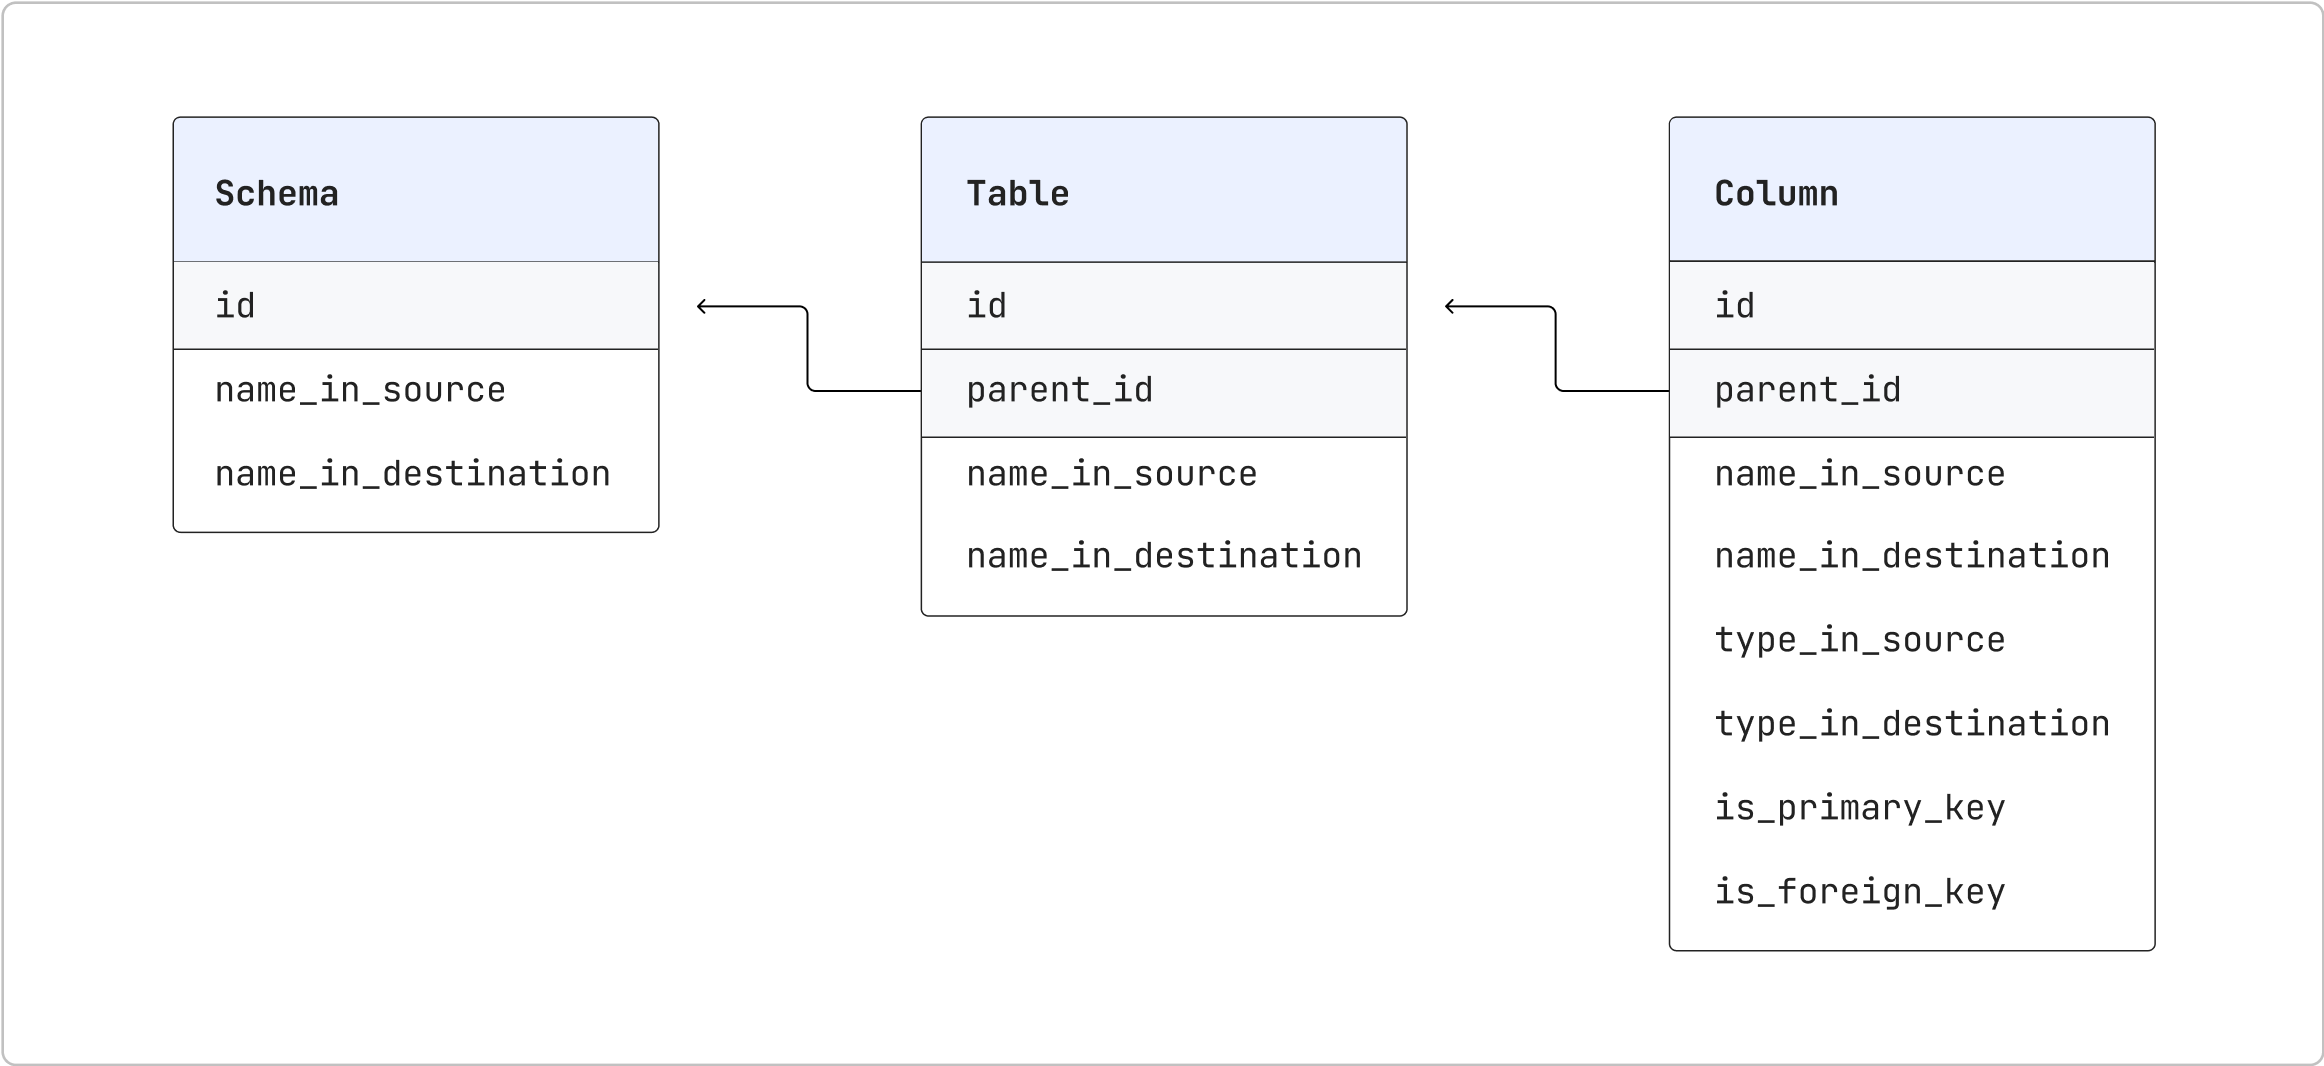
Fivetran constructs a unique identifier for every source and destination through a source, table, and column identifier. The last step will be to find each of these values for every source and destination in each connector.
Thankfully Fivetran has provided a handy visualization describing the relationship between source and destination identifiers through different API endpoints.

To Recap
- Query for all of
connector group's - For each
connector group, query connectors - For each
connector, query schema metadata - For each
schema, query table metadata - For each
table, query column metadata - Tie it all together.
Execution

For the purposes of this guide, we will be using the python requests library for communicating with the Fivetran API. You could use whatever language you prefer or something like curl if you preferred. If you're following along, you should make sure requests is installed with pip install requests before proceeding. We are also going to use a shared session to make scripting a little easier.
Here is a little code snippet to get you started
import requests

session = requests.Session()
self.session.headers.update({"Accept": "application/json"})
self.session.params.update({"limit": 10000}) # This controls the number of results Fivetran will return in each page
The Fivetran API is also paginated, meaning it won't necessarily return all of the results in a single request. You can tell whether this affects you if the response includes a next_cursor value under the data field of the response json. To keep things simple we are ignoring pagination in the code snippets below.
Connector Groups
Each group has a name and a human readable group_id like "decent-dropsy." We need to find all of the group_id's associated with our account. Thankfully, there's already an API endpoint we can use to find all of our groups.
To do so, we will need to
GET https://api.fivetran.com/v1/groups.
A successful result will return something that looks like this
{
    "code": "Success",
    "data": {
        "items": [
            {
                "id": "projected_sickle",
                "name": "Staging",
                "created_at": "2018-12-20T11:59:35.089589Z"
            },
            {
                "id": "schoolmaster_heedless",
                "name": "Production",
                "created_at": "2019-01-08T19:53:52.185146Z"
            }
        ],
        "next_cursor": "eyJza2lwIjoyfQ"
    }
}
Now in python we can query for groups as follows
groups_url = "https://api.fivetran.com/v1/groups"

groups = session.get(url).json()['data']['items']
Connectors
Great, now that we have all of the groups, we need to find the connectors associated with each group. To do that we will
GET https://api.fivetran.com/v1/groups/{group_id}/connectors
It returns results which look like this
{
    "code": "Success",
    "data": {
        "items": [
            {
                "id": "iodize_impressive",
                "group_id": "projected_sickle",
                "service": "salesforce",
                "service_version": 1,
                "schema": "salesforce",
                "connected_by": "concerning_batch",
                "created_at": "2018-07-21T22:55:21.724201Z",
                "succeeded_at": "2018-12-26T17:58:18.245Z",
                "failed_at": "2018-08-24T15:24:58.872491Z",
                "sync_frequency": 60,
                "status": {
                    "setup_state": "connected",
                    "sync_state": "paused",
                    "update_state": "delayed",
                    "is_historical_sync": false,
                    "tasks": [],
                    "warnings": []
                }
            }
        ],
        "next_cursor": "eyJza2lwIjoxfQ"
    }
}
Now in python
connectors = []
for group in groups:
    group_id = group['id']
    url = f"https://api.fivetran.com/v1/groups/{group_id}/connectors"
    group_connectors = session.get(url).json()['data']['items']
    connectors.extend(group_connectors)
Schemas
Alright, now we're cooking with gas. With all of the connectors it's time to start pulling column level data lineage. To do that we will begin by querying the Metadata schemas endpoint with
GET https://api.fivetran.com/v1/metadata/connectors/{connector_id}/schemas.
Again, results will look something like this
{
  "code": "Success",
  "data": {
    "items": [
      {
        "id": "bWFpbl9wdWJsaWM",
        "name_in_source": "Main Public",
        "name_in_destination": "main_public",
      },
      {
        "id": "dXNlcl9zZXR0aW5ncw",
        "name_in_source": "Local backup",
        "name_in_destination": "local_backup"
      }
    ],
    "next_cursor": "eyJza2lwIjoxfQ"
  }
}
For each connector we can now create column level lineage between our sources and destinations. We can iterate over each connector pulling out an associated connector_id from the id field of each element in connectors.
schema_map = {}
url = f"https://api.fivetran.com/v1/metadata/connectors/{connector_id}/schemas"

schemas = session.get(url).json()['data']['items']
for schema in schemas:
    schema_map[schema.pop('id')] = schema
Each schema has multiple tables associated with it and each of the id fields in the response correspond to a parent_id in Tables as we will see in a second.
Tables
Now that we have schemas we will do basically the same thing for the tables endpoint. In this case we will be hitting
GET https://api.fivetran.com/v1/metadata/connectors/{connector_id}/tables
With a result looking like
{
  "code": "Success",
  "data": {
    "items": [
      {
        "id": "NjUwMTU",
        "parent_id": "bWFpbl9wdWJsaWM",
        "name_in_source": "User Accounts",
        "name_in_destination": "user_accounts"
      },
      {
        "id": "NjUwMTY",
        "parent_id": "bWFpbl9wdWJsaWM",
        "name_in_source": "User Subscriptions",
        "name_in_destination": "user_subscriptions"
      },
      {
        "id": "NjUwMTW",
        "parent_id": "bWFpbl9wdWJsaWM",
        "name_in_source": "Account Details",
        "name_in_destination": "account_details"
      }
    ],
    "next_cursor": "YUWEudlwIjoxkK"
  }
}
Things are a little more complicated because we have to deal with both id and parent_id which, just as a reminder, is the id value from it's corresponding schema. This time we will use a nested dictionary looking like Dict[<schema_id>, Dict[<table_id>, <names dictionary>]].
table_map = {}

url = f"https://api.fivetran.com/v1/metadata/connectors/{connector_id}/tables"

tables = session.get(url).json()['data']['items']
for table in tables:
    schema_id = table.pop('parent_id')
    table_id = table.pop('id')

    table_map.setdefault(schema_id, {})
    table_map[schema_id].setdefault(table_id, {})

    table_map[schema_id][table_id] = table
As with schemas, each table has multiple associated columns. We will have to play a similar game one more time.
Columns
Now we will use the columns endpoint
GET https://api.fivetran.com/v1/metadata/connectors/{connector_id}/columns
With a corresponding json response
{
  "code": "Success",
  "data": {
    "items": [
      {
        "id": "NTY4ODgzNDI",
        "parent_id": "NjUwMTU",
        "name_in_source": "id",
        "name_in_destination": "id",
        "type_in_source": "Integer",
        "type_in_destination": "Integer",
        "is_primary_key": true,
        "is_foreign_key": false
      },
      {
        "id": "NTY4ODgzNDM",
        "parent_id": "NjUwMTU",
        "name_in_source": "FirstName",
        "name_in_destination": "first_name",
        "type_in_source": "String",
        "type_in_destination": "Text",
        "is_primary_key": false,
        "is_foreign_key": false
      }
    ],
    "next_cursor": "YUWEudlwIjoxkK"
  }
}
In this case the parent_id is actually a reference to tables rather than schema though. So, we are going to produce a dictionary that looks like Dict[<table_id>, Dict[<column_id>, <names dictionary>]]
column_map = {}
url = f"https://api.fivetran.com/v1/metadata/connectors/{connector_id}/columns"

columns = session.get(url).json()['data']['items']
for column in columns:
    table_id = table.pop('parent_id')
    column_id = table.pop('id')

    column_map(table_id, {})
    column_map[table_id].setdefault(column_id, {})

    column_map[table_id][column_id] = column
Bringing It Together
We've come a long way, including querying for all of the tables and columns being managed by Fivetran alongside a wealth of metadata about our columns, like their types, and whether they are primary or foreign keys. What's left is to bring together the final relationship between all of the names in sources and the corresponding destination names. To do that we will run one final piece of python code to generate complete names consisting of {schema}.{table}.{column}.
column_lineage_map = {}

for schema_id, schema_names in schema_map.items()():
    source_schema = schema_names['name_in_source']
    destination_schema = schema_names['name_in_destination']

    for table_id, table_names in table_map[schema_id].items():
        source_table = table_names['name_in_source']
        destination_table = table_names['name_in_destination']

        for column_id, column_names in column_map[table_id].items():
            source_column = column_names['name_in_source']
            destination_column = column_names['name_in_destination']

            full_source_name = f"{source_schema}.{source_table}.{source_column}"
            full_destination_name = f"{destination_schema}.{destination_table}.{destination_column}"
            column_lineage_map[full_source_name] = full_destination_name
And that's it, you can now explicitly relate every source identifier in your data stack with a corresponding destination identifier.
What's Next
If you've gotten this far you should have everything you need to extract and visualize data lineage in Fivetran. If you're looking for something pre-built checkout the grai-source-fivetran package, it handles. If you're interested in exploring source code check it out here.

